Sunday 28 December 2014

Save Android Battery using Battery Saving Apps

As android contains heavy machinery in it, so it needs a large amount of charges to consume. That's why consumption of battery in smart phone is repaid. Excluding the heavy machinery the number of Apps processing at same time is also the main reason of this. But you can minimize this problem using some battery saving apps.


What Are Battery Saving Apps?

Battery Saving apps are those applications which are design to increase your battery life. They manage your smart phone in such a way that it consumes less amount of battery. For example it adjusts brightness and close other programs which are not useful and consumes battery of your android.


Battery Saving Apps for Android

Following are the Apps with their features for battery saving of Android.


Juice Defender


Juice Defender is one of the most famous app for battery saving in androids. It has a lot of features and is fully customizable. It increases battery of your smart phone to hours. It automatically starts after installation and works intelligently. It has following main features:
  • Powerful
  • Smart
  • Easy To Use

https://play.google.com/store/apps/details?id=com.latedroid.juicedefender&hl=en


Battery Doctor


Battery Doctor is another Battery Saving App and is suitable alternative of Juice defender. It regularly cleans extra and unused apps running on background of your screen and turns off packet data, WiFi etc. if not in used. It has following main features.
  • Make low frequency of consumption on home screen
  • 19 different languages
  • Saves a lot of battery when cell is not in use

https://play.google.com/store/apps/details?id=com.ijinshan.kbatterydoctor_en&hl=en


Go Battery Saver


Go battery Saver is considered as one of the best battery saving apps. It has given highest ranking among all of battery saver apps. It is friendly for use. It has nearly same features of above apps but is still better then those. It has following main features.
  • Custom saving mode
  • Beautiful layout
  • Easy and friendly to use

https://play.google.com/store/apps/details?id=com.gau.go.launcherex.gowidget.gopowermaster&hl=en

DU Battery Saver


DU battery saver app has given the rank of 2 after Go battery saver. It works great on Galaxy notes. About 89% users has given positive comments while 11% shows some issues which is neglect able to some extent. It is good alternative of Go battery and battery Doctor. It has following main features.
  • Increases up to half time of batter
  • One touch Control
  • Extend Battery life
https://play.google.com/store/apps/details?id=com.dianxinos.dxbs&hl=en


What's Good In Using all these Apps?

As all these apps increases timing of your smart phone's battery hence increase life of your battery. If you are android user you must use it.

Friday 26 December 2014

Unblock Youtube and Other Blocked Sites Using ZenMate Plugin

Blocking of various websites specially YouTube has become a major problem for common user as well as blogger or other professionals earning from E-commerce. YouTube is useful source for advertisement and earning purpose and no doubt is the biggest site for videos.  But due to some reasons it is blocked in different regions. To unblock various sites including Youtube  users use different proxy which involves Hotspot Sheild, SpotFlux and others. But they have some major problems.


Problems Of Proxy

When you apply proxy using softwares like Hotsop Sheild you face following problems usually.

  • IT slow down your browsing speed
  • Make your computer to work slow.
  • Made their own device in computer which effects your computer
  • Show irritating Ads
But ZenMate Plugin can solve these problems.


What is ZenMate?

ZenMate is a plugin which is installed in your browser. It needs no setup or device to made in your system. It simply appears on your browser and you can use it when ever you want.


How It Works?

It works also works as a proxy but as compared to all softwares it is best. You can unblock Youtube and other websites using ZenMate plugin by simply enabling it. After installing, it appears on upper right bar of your browser if you are talking about Firefox. You have to turn on it by clicking it and it will change your IP Address so that you can unblock websites.


How to Install ZenMate Plugin?

To Install ZenMate Plugin Follow these simple steps.
(This tutorial is for Firefox you can add this plugin on other browsers from their own adds on sites)

Steps To Install ZenMate Plugin

1: Open this link https://addons.mozilla.org/fr/firefox/addon/zenmate-security-privacy-vpn/?src=hp-dl-upandcoming


2: Click on "Add to Firefox"


3:Click on "Install now" in the new window of software installation.


4: After installation click on ZenMate Icon and switch it to on.

You have done. Unblock websites and enjoy!

Follow us on Facebook: Graspinfo

Friday 19 December 2014

Understanding of Blogger Template

Blogger Template now a days has became the main problem for beginner bloggers. When ever they have to deal with Blogger template they feel difficulty and consult with Google but still some times cannot find their solution because they don't know about template. This article will provide you a comprehensive information for basics of template.First of all you should know the meaning of Template.

What is Blogger Template?

what is blogger template


A blogger Template is a pattern of the webpage on which different widgets are arranged in sequence according to our settings. It in fact is a whole structure of blog. It defines Writing style, Color scheme, Header, Side bar, footer etc. In short it is because of Template that you are able to see the blog with sequence and beauty.


Main Parts Of Template

A template has five main Parts
  • XML
  • CSS
  • HEAD
  • BODY
  • VARIABLES.
I will discuss every part in detail.


XML:

Blogger Template started with XML. Actually whole blogger template is based on HTML (Hyper Text Markup Language) which is the language of Internet. All other parts of template is closed in this XML part. Blogger Template begins with the following code
   <?xml version="1.0" encoding="UTF-8" ?>
<!DOCTYPE html PUBLIC "-//W3C//DTD XHTML 1.0 Strict//EN" "http://www.w3.org/TR/xhtml1/DTD/xhtml1-strict.dtd">
<html expr:dir='data:blog.languageDirection' xmlns='http://www.w3.org/1999/xhtml' xmlns:b='http://www.google.com/2005/gml/b' xmlns:data='http://www.google.com/2005/gml/data' xmlns:expr='http://www.google.com/2005/gml/expr'>
Now I will explain parts of this syntax one by one.

WHAT does "<?xml version="1.0" encoding="UTF-8" ?>" declares?

This part is processing instruction. It defines the type of language. As it is beginning with XML so it declarers that the document is XML.
Version declares the standard version which is being used.
Encoding="UTF-8" ? declares the name of coding used. It is the coding which now a days is using.

What is <!DOCTYPE> Part?

In <!DOCTYPE defines the type of document used in template. As template is based on HTML so doc type is html and W3.org is an international community which is used for standard scales. So further code defines that this is based according to W3.org rules of 1999. 

As I told you whole template is closed in HTML so at the end of template it is closed with the ending tag of </html>.


What is Head Part?

Head part begins with <head> tag and ends with closing tag </head> between this all blogger widgets are placed. Coding for widgets are placed after the head tag. It encloses titles for scripts, styles, meta information, document etc. Style may contains pixels, writing style of template etc.


What is Body Part?

Body part begins with tag <body> and ends at </body>. It contains all widgets of template like Recent posts, comment, poplar post etc. Main parts of body are Header, Side bars, Footer and content portion.

If you have to make amendments in widgets or want to show or hide widgets at specific page you will deal within the body part.


What Is CSS?

CSS stands for Cascading Style Sheets. This is the language used to give look to document written in HTML. CSS was introduced to solve the problems of HTML. It defines how to display HTML elements. It was first introduced for solving the problems of HTML 4.0. It is a set consists of two parts. 

Selector:

It is that HTML part for which style is described.


Declaration: 

It is the Style for HTML selector. It further consists of property and value.


 CSS can be used any where in template for giving style to document.

For example: You want to change the color of text. Then just insert <style> tag after that p {color:red;text-align: center;}  and close that with </style> tag and write what ever you want to write in starting and closing p tag i.e <p>This paragraph is styled with CSS.</p>. And you will show that text in red color.

Similarly you can give style to your widgets with CSS like hover, float etc.


Variables

Variables are unique the values which holds some other values in it. The name of variables should be unique. This unique name is called Identifier as variable is identified by this name. We assign some value to the variable and use it in the whole template where ever we want to use.

For Example

If we have two variables "x"and "y" and we want to assign the values 2 and 3 respectively then we will write
var x = 2
var y = 3
but we have to write this in script tag and before applying script tag we will some identity for that script and we will take the value of these variables any where in template by using that id which we have assigned.

Complete Syntax for Variables


<p id="assignedid"></p>

<script>
var x = 2;
var y = 3;
document.getElementById("assignedid").innerHTML = x + y;
</script>

In this example first we have assigned identity for variables i.e "assignedid" after that they are closed between script tag i.e <script> and </script> after that we assigned value to variables i.e 2, and 3 and finally we use these variables for sum purpose i.e x + y which will be equal to 5.

How variables Are Used In Templates?

In template mostly variables are used for color purpose so that color code may not be repeated again and again. We can also use it for other purposes according to wish.

Hope this article will help you!

Tuesday 16 December 2014

Make Matrix effect using Batch File

You can get information about Batch File in our previous article. What is Batch File.
In this article you will learn to make Matrix effect in Batch file. Matrix effect is the effect which will repeat some texts in DOS again and again in the sequence from up to down. You can assign any color to the text you want to show and can write anything you want.


Steps To Make Matrix Effect


1: Open Note pad. By clicking right click on desktop screen and after that click New → Text Document.


2: Write the following command in note pad.


@echo off
color 02
:start
echo %random% %random% %random%
%random% Hacked by Graspinfo.blogspot.com %random%
%random% %random% %random% %random%
%random%
goto start


3: Now save the file as ".bat" i.e go to files → Save as → write any name like Internet Explorer or any thing → Select "All files" option in Save as type and hit save.


4: Now Run that file and see what you have created. Send it to your friend and enjoy.

Amendments:

In the text of matrix you can change color or Text.
  • To change color Replace "02" with any number like 01 will show dark blue, 03 will show light blue and so on.

  • To change the text you want to show Replace "Hacked by Graspinfo.blogspot.com" with the text you want to show.

Feel free to ask at Contact us.

Sunday 14 December 2014

Annoy Your Friend By Making Simple Virus

You can make simple Couputer Viruses by using Notepad and save the file as (.bat) extension i.e Batch file. A Batch File is a file which contains number of instructions in it. When you open or run it it do work according to the command given to it. You can create a bat file simply by opening notepad and save it to batch format. It is actually DOS which works as bat file.Batch file could be very useful sometimes for solving problems. Like sometimes due to virus file your Pin drive i.e USB is neither  opening nor formatting  then you can format it by using DOS. But Batch File can also be used for having Fun like for creating simple Viruses for annoying your friends.


Steps To Make Virus:


1: Open Note pad. By clicking right click on desktop screen and after that click New → Text Document.


2: Copy the following and paste it on note pad.
start
start
start
start
start
start
start
start
start
start
Write "Start" as much times as you wish to annoy your friend. It will open Dos 10 times as start is written 10 times. If you write it 100 times it will open 100 dos windows and surly victim will be annoyed.


3: Now save the file as ".bat" i.e go to files → Save as → write any name like Internet Explorer or any thing → Select "All files" option in Save as type and hit save.


4: Now Run that file and see what you have created. Send it to your friend and enjoy.

You have done. Like us on Facebook to get more tricks: www.facebook.com/Graspinfo


Tuesday 9 December 2014

Create Your Own Social Media Widget

As use of Social Media is necessary for Bloggers Now a days. The one who wants to be a successful blogger needs social media. He has to made Facebook page, Twitter Account, Use Pinterest, Google+ and other social media websites. In short He has to use social media to Increase Traffic.
In this article I Will tell you how to make your own social media widget for your Blog.


Steps To Make Your Own Social Media Widget


1: Upload pics of your social Icon like Facebook, Twitter, Google+ etc. any where. For example you can upload it to your blog or can make some other blog for this purpose. You just need link of these pictures. To take link of picture just right click on it and click on "view image" and select the link of image and save it in note pad. Similarly upload all the social icons like twitter and Google plus and save their links.
You can simply copy links of images from somewhere but it should be social icon i.e size should be not too big.


2: Now go to Blogger → Layout and click on "Add a gadget". You should place Social Icon on side bar.


3: Click on  HTML/JavaScript Add to add widget code.


4: Paste the code given Below in the box content box.

<style>
#sidebar-subscribe-box{width:317px;padding:3px 0}
 .sidebar-subscribe-box-wrapper{background:url(Background Image) repeat scroll 0 0 #f7f7f7;color:#111;font-size:14px;line-height:0px;padding:1px 20px 10px;text-align:center;text-transform:uppercase}
a.social-icons{margin-right: 5px;height:50px;width:45px;}
a.social-icons:hover { opacity: .7; filter:alpha(opacity=70);}
</style>

<div id="sidebar-subscribe-box">
<div class="sidebar-subscribe-box-wrapper">
    <br/>
<a class="social-icons" href="https://www.facebook.com/graspinfo"><img src="https://blogger.googleusercontent.com/img/b/R29vZ2xl/AVvXsEjW7DWlAMI2O83jt2UZTKemmdRqNRnU3HWUfeZdsOW7chXn29McMQhEoKAyBz2uGn5zcJb1KgPg14WOGrOPjLAP8t_wKPlU5jUe6LueXVVoOjpSMBs-k4C-JgSL7_QXEqZXb6dexKiJzbmc/s1600/facebook.png" /></a>
<a class="social-icons" href="https://www.twitter.com/syyeddaud"><img src="https://blogger.googleusercontent.com/img/b/R29vZ2xl/AVvXsEgfg0d2aluhHwTZYLM7LPci6zqKTo6LeyyBLvg4wiqZITqDxr2zNOVVbTr6S-Hh0FnbgeZUTTuD0fbdOZ4ampStrscVMdq4iBK-CPJu7WFCJzYN6yuEu9ISEvr1bawIPuj9WMGplpu68ljy/s1600/twitter.png" /></a>
<a class="social-icons" href="https://plus.google.com/u/0/b/100089903872601786895/"><img src="https://blogger.googleusercontent.com/img/b/R29vZ2xl/AVvXsEjqqfKmZArYT78dysTm-ciwTCrP0qlW1WWV-_-oqnHlWJwCUn9s8dMP4hoMDXNQWPYwzuR1eb7puBplKgjtXZzfhIzdNlL62r27yMt-7YZ-PrxFQNRDTeD1XRzJfPH0WcbICLg32xjaqvDz/s1600/google+.png" /></a>
</div></div>


Amendments:

  • Replace the links which is highlighted by Red color with the links of your Pages or profiles.
  • Replace the image link highlighted by purple color with the link which you have save in note pad.


5: Give title to this widget like "Meet us on social media" or any title you want and hit save.
You have done.

Feel free to ask and must like our page at facebook. https://www.facebook.com/Graspinfo


Thursday 4 December 2014

How to Turn off Windows Updates in Windows 8

What Are Windows Updates?

Windows Updates are actually meant for safety of your system. These updates are latest security measures which Microsoft develops. If your Windows updates are automatic then Microsoft keeps sending you these updates so that your PC keep running safer and smoother.


Windows Updates Impact On PC

Windows updates are not good for the PC (Personal Computer) as personal computers have usually hard drives of 500 to terabyte (maximum). So if updates are automatic then Microsoft will keep sending you these updates on daily basis and it will consume your hard drive's space and hence it will cover a large size of your drive. So you should turn off your system's windows updates if it is for personal or home use.


How To Turn Off Windows Updates
Just Follow the following simple steps which are demonstrated by screen shots to turn off Windows Updates.


1: Open Charms. To open Charms appears when you move your mouse courser to right corner and then come back to left by clicking. You can also Open Charms by using Shortcut Keys given below
Windows key + C
 To learn more about Charms visit this LINK


2:Go to settings option in last.


3:Click on "Change PC settings"


4:A new window will appear on which there will be personalize settings on right side and PC settings on right side. You have to deal with right bar. Click on last option i.e "Update and Recovery"


5: Now you have "Update and Recovery"menu. Select first option. i.e Windows Update.


6: Now select "Never Check For Updates"the last option in first box and hit apply.

You have done!

Monday 1 December 2014

How To Rest Windows 8 Password using USB

Microsoft has provided a great feature in Windows 7, 8 and 8.1 that you can reset your local windows password (If it is not Microsoft account) simply by using Flash drive (USB). It may also use for hacking purpose as it applies on all systems. This article will provide you step by step guide about "How to Break Windows 8 password"


Steps Of Resting Windows Password

If you are resting password of your own password as you forgot your password then you have to do first 6 steps in some one other's computer with same window i.e 8 or 7.


1: Insert USB in the system


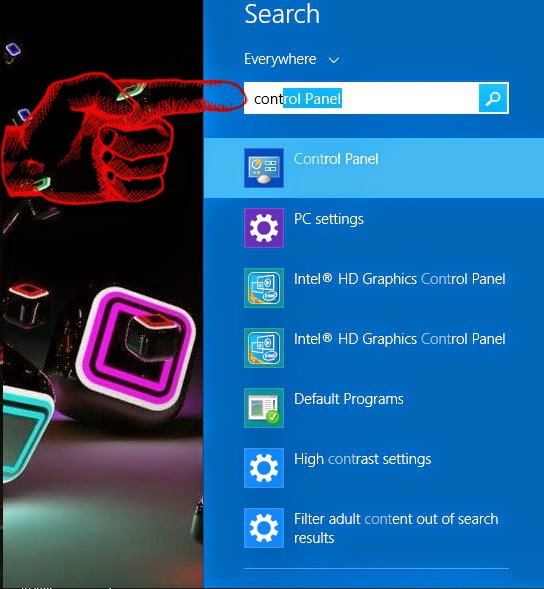
2: Go to Control panel, you can simply go to control panel by writing it on windows search.


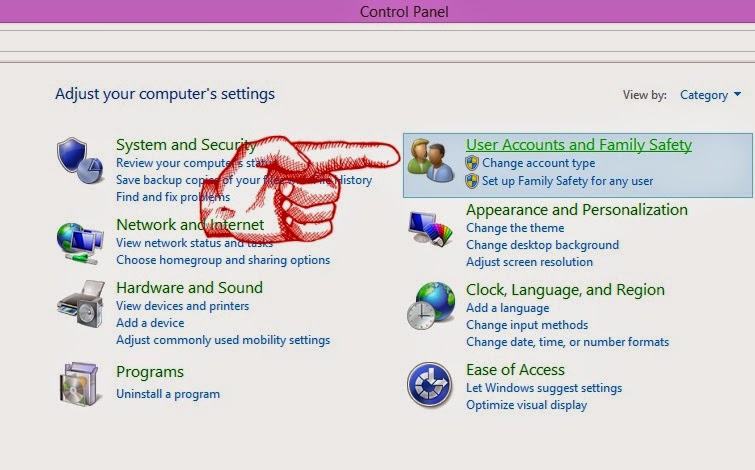
3: After opening Control Panel → Go to "Users Account and Family Safety"


4: When you open "User Account and Family Safety" then a new window will open. You have to select the first option i.e "User Account"


5: Now click on "Create Password Reset Disk" on the left side tab i.e 3rd option.


6: Now Select Next → Next → Next and again Next.


7: Now you have created your Password Rest Disk. Now Simply insert this USB in your system and Enter any password and click on Rest Password and choose this USB to rest password and simply enter the new password.
YOU HAVE DONE!

(You can also use this technique for hacking purpose, but remember that this trick is applicable only on Local account not for Microsoft account)

Feel Free to ask on our contact Forum: Contact Us

Popular Posts


© 2013 Grasp Info. All rights resevered. Designed by Graspinfo

Back To Top