Thursday 27 November 2014

How to change Favicon of Your Blog

In this article you will learn "How to change favicon of your Blog". But first you should know what is Favicon.

What Is Favicon?

Favicon is the Sign or pic that appears in the tab upper to your Address bar. You can say that it is the sign of your Blog or website. After Favicon tittle of your website appears.
favicon of graspinfo


How To Change Favicon Of Your Blog?

You have to follow the following simple steps to alter the favicon sign.

1: First of all decide the image you want to make Favicon.


2: Go to favicon-generator.org


3: Browse the image you want to make the favicon and click on "Create Favicon" and download the generated favcion.
(It will convert the dimension of image to "16x16"remember if you have already an image of size 16x16 then you have no need to follow 3rd step.)


4: Go to Blogger → Layout and click on "Edit" of the favicon tab.


5: Now browse the location of generated favicon and hit save. Click on save settings you have done.


Trouble Shoot

After changing the favicon it will not appear when you open your blog. It is because your browser have saved the previous history and cache memory. So just restart your browser i.e close and then open again and see your blog favicon will be changed. If it does not change just delete cache, history and cookies and then see again favicon will be changed.


Tuesday 25 November 2014

How to Make New Partitions in Windows 8.1 without formatting

When we install windows 8 or update it to 8.1 usually it contains only one drive i.e OS drive. You can also make sub drives by shrinking the volume of OS drive. This article will provide you step by step guide about "How to make new drives in windows 8"

Steps To Make New Partitions Without Formatting The Drive


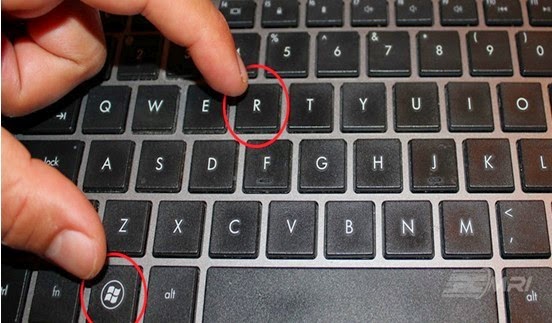
1: First of all you have to open "Run" menu. To open that press
"Windows Button + R" from keyboard.


2: By completing first step "Run" menu will open. Write the following command
Diskmgmt.msc
and press "OK" to open Disk Management.


3: Disk management contains 2 portions, upper for the detail of disk drives and down portion to make amendments. Now right click on the drive you want to make partitions of. For example if you want to make partitions of A drive. Right click on it and click on "Shrink Volume"


4: Enter the value of space in MB in 3rd box. Remember that this is the amount of space which will be reduced from your drive A and shifted to another new drive you are making. For example If i want to make new drive of 100 GB i will enter the amount "100000" in MB. Now press "Shrink"button


5: After shrinking there will be new "Unallocated" drive. Right Click on it and go to the first option i.e "New Simple Volume.."


6:It will open a Wizard. Click on Next → Next. Assign name to your new drive. (A, B, D etc.) and press next → next.

Congratulation! you have created a new drive. You can further shrink that drive if you want. 
Feel free to ask any question.

Monday 24 November 2014

Some Features In Windows 8 You Should Know

You Can Add Start Menu In Windows 8

As we know that all users of windows 8 face problem of not having start Menu. But know Microsoft has launched an update of Windows 8 i.e you can convert windows 8 to 8.1. Update of windows contains start menu. Click Here to Get Update of Windows 8.


Keyboard Shortcut Keys Of Windows 8

Windows 8 has a lot of Shortcut keys. If you know about them you can easily use windows 8 and it will be friendly to you.

  • Windows key + D = Desktop
  • Windows key + X = Power User menu ( you can go to device manager command prompt etc. through power menu)
  • Windows key + I = Settings
  • Windows key + Tab Button = Show Open applications in different Tabs
  • Windows key + Prntscr (Print Screen) = Take Screen Shot.
  • Windows Key + C = Charms

Terminologies

What is Power User Menu?

Power User Menu is a menu from where you can access in other menus of user like Command and prompt, Device Manger.

What is Charms?

Microsoft introduces a new feature in Windows i.e Charms. "The menu which appears when we press window + C is called Charms menu" This menu contains Search, share, start, devices and settings options. We can go to all these further menus after clicking on their icons. It also appears when you move your mouse courser to right corner and then come back to left.

 The Red highlighted bar is charms.

 Apps in Windows 8e
In windows 8 there is another amazing feature of apps. MS introduces apps in windows 8 which appears in start menu. These apps contains Weather, calender, Internet Explorer, Store, Entertainment like Music, Games, Camera etc. You can also download Apps of windows 8 form http://windows.microsoft.com/en-us/windows-8/apps#Cat=t0


SkyDrive Feature

You can share your files, pics, videos, etc. with SkyDrive app in Windows 8. This sharing can be done with all those computers which are connected with internet and have Cloud. The term cloud is used for network or number of computers connected with each other. The files in SkyDrive are not saved in your system but are saved on internet so that in case of any mishap these files remain protected.


Install ISO files Directly
In windows 8 you have no need of burning software like Alcohol etc. to install ISO file after creating an image. But in windows 8 you can install ISO file directly following simple steps:
  1. Right Click on ISO file
  2. Click on first option i.e "Mount"
  3. Images will appear. Install the setup you want to install.


New Task Manager

Task manager of windows 8 is best of all the previous task managers. Task manager of windows 8 is modified completely. All tabs like performance, Process, App history, Start up, Users, Details, Services all get some extra features.


Friday 21 November 2014

How To Add Facebook Comment Gedget In Blog

Now you can use Facebook comment box in your Blog. Facebook gives us an opportunity that you can embed Facebook comment plugin code to your website or blog. Any visitor can comment on your blog's post by his/her Facebook ID.


Why You Should Add Facebook Comment Plugin?

Facebook is the world's number one Social Media website. Every one uses Facebook. Even when a person is doing research or Blogging or any work Facebook is usually open in a tab. So when user comes to your web page he can comment as his Facebook ID. It makes your Blog a forum and Social.


Steps to Add Facebook Comment Box Plugin

You have to follow some simple steps to add Facebook Comment box widget to your web page. First you have to create your Facebook Developer ID, after that you have to add some HTML and CSS codes to your template with some amendments.

How To Make Facebook Developer ID?
To create your Facebook Developer ID you have to Follow following steps


1: Go to https://developers.facebook.com/apps/?action=create

2: Click on "Register Now"


3: A new window will be open switch to "Yes" and hit next.

4:After that a new window of "Register as Facebook Developer" will be open for confirmation. Enter your phone number and hit on "Send as Text" you will receive a confirmation code. Enter this code in confirmation code box and click on Register.
(Facebook may not ask you about confirmation, but mostly it requires confirmation)


5: Now Go to https://developers.facebook.com/apps/?action=create
and click on "Create a new App"


6: After that new window will be open which will need your app information. Give your Website url in Display Name and Title of your Website in Name space. How ever you can assign any name space you want. But don't give spaces and don't use Upper case (Capital Alphabets) in name space. Hit Create app ID and enter security Check code.


7: Now you have done the Registration of Facebook Web Developer ID. On new window i.e App Tab there will be your App ID and App Secrete. You need your App ID. Copy app ID and paste it on note pad.
Now it's time to add Facebook comment Box to Your Blog.


Add Facebook Comment Plugin To Your Blog

Just Follow the following Steps to add Facebook Comment Box in your Blog.

1:Open Blogger.com → Go to Template → Go to edit html.


2: Search for

<html
Give a space after the <html and paste the following code after space
xmlns:fb='http://www.facebook.com/2008/fbml'
you can search any thing in Template html by pressing "Ctrl+F"
(Space is necessary) 


3: Find
<body>
and if it is not available find
<body expr:class='&quot;loading&quot; + data:blog.mobileClass'>
(Some template defines Body by the tag <body> while in some templates "<body expr:class='&quot;loading&quot; + data:blog.mobileClass'>" is present instead of <body> so hace to find any of these.)


4:After that <body> or <body expr:class='&quot;loading&quot; + data:blog.mobileClass'> place the following code.
 <div id='fb-root'/>
<script>
    window.fbAsyncInit = function() {
    FB.init({
      appId  : &#39;Your-App-ID&#39;,
      status : true, // check login status
        cookie : true, // enable cookies to allow the server to access the   session
      xfbml  : true  // parse XFBML
    });
  };
    (function() {
    var e = document.createElement(&#39;script&#39;);
      e.src = document.location.protocol +   &#39;//connect.facebook.net/en_US/all.js&#39;;
    e.async = true;
      document.getElementById(&#39;fb-root&#39;).appendChild(e);
    }());
</script>
Amendment: Replace "Your-App-ID" with your app id that you have pasted in note pad.


5:Now find the
<b:includable id='comment-form' var='post'>
and after that place the following code
<b:if cond='data:blog.pageType == &quot;item&quot;'>
<div style='padding:0px 0px 0px 0px; margin:0px 0px 0px 0px;'><script src='http://connect.facebook.net/en_US/all.js#xfbml=1'/>
<div> <fb:comments  colorscheme='light' expr:href='data:post.url' expr:title='data:post.title' expr:xid='data:post.id' width='520'/></div>
<div style='color:#fff; background-color:#3B5998;border: solid 1px #ddd; font-size:10px; padding:3px; width:510px;'>Facebook Blogger Plugin: Bloggerized by <b><a alt='blogger templates' href='http://www.allblogtools.com/' style='text-decoration:underline; color:#fff;' target='_blank' title='blogger templates'>AllBlogTools.com</a></script>>Get this <a href="http://graspinfo.blogspot.com/2014/11/how-to-add-facebook-comment-gedget-in.html" rel="nofollow" >Add Facebook Comment Box Widget To Blog Widget</a>
 Amendment: You can change the appearance of comment box by changing "light" with "dark"similarly you can also adjust width. But i prefer not to change colour scheme. Dark will look awkward.


6: Hit Save and You have done!

If you face any trouble feel free to ask.


Monday 17 November 2014

How To Add Recent Comment Gadget With Picture to Blogger

Recent Comment Gadget is the gadget which show most recent comments on the posts of your website. It is a code which involves CSS as well as Java Script. You can add this widget to any where according to your template design. i.e in side bars. At down bottom, below the header. But most suitable place is at down bottom of your Blog. It shows the number of comments as much as you want to show, you have to make amendment in code which I Will tell you in this post.
 Add Recent Comment Widget with Pictures Step by Step


Step 1: Sign in to Blogger dashboard Click on More option drop menu sign → Go to layout.


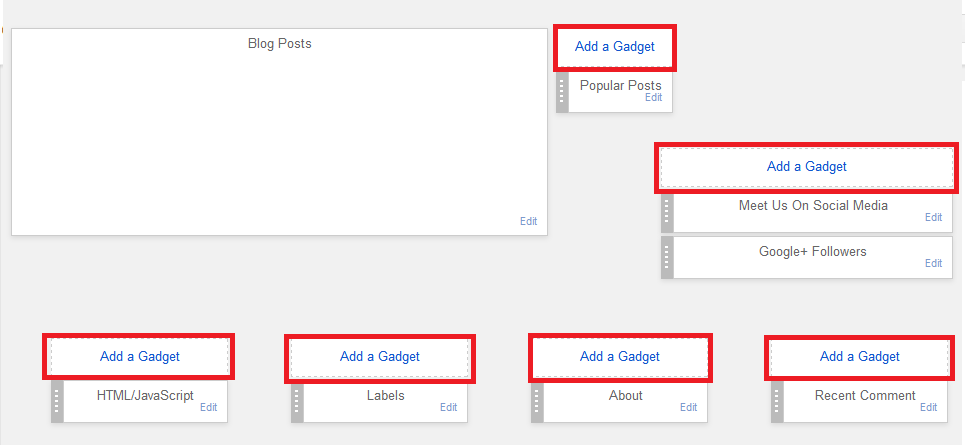
Step 2: Click on "Add a Gadget" to any where in template where you want to place this widget. (You can also replace it after adding widget by dragging).


Step 3: Click on "HTML/JAVA Script" widget to add that.


Step 4: Copy the Below code and paste it in "Content Box"

<style type="text/css">
ul.bgt_recent_comments {
    list-style: none;
    margin: 0;
    padding: 0;
}

.bgt_recent_comments li {
    background: none !important;
    margin: 0 0 6px !important;
    padding: 0 0 6px 0 !important;
    display: block;
    clear: both;
    overflow: hidden;
    list-style: none;
}

.bgt_recent_comments li .avatarImage {
    padding: 3px;
    background: #fefefe;
    -webkit-box-shadow: 0 1px 1px #ccc;
    -moz-box-shadow: 0 1px 1px #ccc;
    box-shadow: 0 1px 1px #ccc;
    float: left;
    margin: 0 6px 0 0;
    position: relative;
    overflow: hidden;
}

.avatarRound {
    -webkit-border-radius: 100px;
    -moz-border-radius: 100px;
    border-radius: 100px;
}

.bgt_recent_comments li img {
    padding: 0px;
    position: relative;
    overflow: hidden;
    display: block;
}

.bgt_recent_comments li span {
    margin-top: 4px;
    color: #666;
    display: block;
    font-size: 12px;
    font-style: italic;
    line-height: 1.4;
}
</style>
<script type="text/javascript">
//<![CDATA[
    // Recent Comments Settings
    var
 numComments  = 5,
 showAvatar  = true,
 avatarSize  = 60,
 roundAvatar = true,
 characters  = 40,
 showMorelink = false,
 moreLinktext = "More »",
 defaultAvatar  = "http://www.gravatar.com/avatar/?d=mm",
 hideCredits = true;
//]]>
</script>
<script type="text/javascript" src="http://yourjavascript.com/53371516181/bgt-recent-comments-with-avatars.js"></script>
<script type="text/javascript" src="http://graspinfo.blogspot.com/feeds/comments/default?alt=json&callback=bgt_recent_comments&max-results=5"></script>>Get this <a href="http://graspinfo.blogspot.com/2014/11/how-to-add-recent-comment-gadget-with.html" rel="nofollow" >Recent Comments Widget</a>

Amendments:

  • Replace "http:/graspinfo.blogspot.com" with the address of your Blog.
  • Replace  numComments  = 5 with the number of comments you want to show.


Step 5: Click Save button and then save arrangement and see your Blog. You have done.


Feel Free to Question.
 

Sunday 16 November 2014

How to Go Offline For Specific Person at Facebook

To turn off chat for particular person, follow the following steps:-
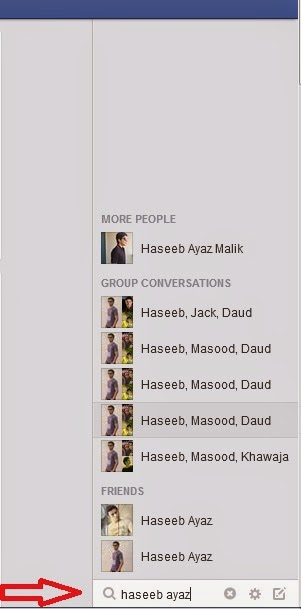
1:After logging in to you r Facebook account, search your friend's name in the search box of chat

2: Open chat of that person by clicking on his name, and go to settings icon.

 3:Go Fourth option i.e "Turn off chat for friend" and you have done

Saturday 15 November 2014

How to Start Blogging - Beginners guide


What is Blogging?

Blog means "add new material to or regularly update a blog" or
write about (an event, situation, topic, etc.) in Blog. So blogging means to write about some thing in your webpage.

Why You Should Start Blogging?
If you want to live a dot com life style then you should start Blogging without wasting your time. Bloggers are earning seven digits earning per month and hence they are millionaire.

How to Start Blogging?
1:To start Free Blogging You should have your Google account. If you don't have yet your Google account then signup to Gmail.com.
2:Now Log on to Blogger.com and sign in there with your Gmail account
3:After clicking on Create a new Blog, new window will appear on your screen where you have to choose Blog's Title, Address and Template.

Title

In title field, type the text which you want to assign your Blog. Title should be unique and good. It should not be too large. You Should write 1 or 2 words in title. This title will be shown on the tab after favicon.
Example: Title of http://www.wikipedia.org/ is Wikipedia.

Address

In address field write the address you want to assign to your blog.
Example: www.graspinfo.blogspot.com but this address should be available i.e "should not be taken already by someone else.

Template

Now choose template. Template is actually design of blog. It contains Header, side bars, space for widgets. You should choose template according to your Blog topic. i.e simple if it is for articles dynamic if it is meant for wallpapers etc. You can also get templates from other websites like btemplates.com and templateism.com.

You have created your Blog

Click on create Blog and you have done. Now you should start Postings and build audience.


Thursday 13 November 2014

Increase Traffic Use Social Media

Today the Blogger who is not using social media for sharing his contents and posts is
squandering a huge opportunity. When someone publishes his post and not shares it on any social media website then visitors of this post would be almost fifty percent less as compared to the one who shares it.

Popular Social Media Websites:

Facebook
Pinterest
Tumblr
instagram
VK
flicker
Vine
meetUp
tagged
ask.fm
meetme
calssMates

If you want to boost your webpage's traffic you should join these sites.

How To Get Benefit From Social Media:


First of all you have to create account on all top social media websites specially on
Facebook, Twitter ,Google+, Linked In, Pinterest . Now you have to add widget of all social media websites you are using to your Blog. You can get these widgets by social media site like facebook. If you want to add all social icons at once then go to addthis.com where you can get sharing tool, and like tool.

Thursday 6 November 2014

How To Make Simple Virus

Making virus is fun. While it is difficult too. But there are many types of computer viruses. Virus is anything which makes undesirable change to your system. According to Wikipedia
A computer virus is a malware program that, when executed, replicates by inserting copies of itself (possibly modified) into other computer programs, data files, or the boot sector of the hard drive; when this replication succeeds, the affected areas are then said to be "infected".
how to make virus
You can also make simple computer virus which is too easy. In this article I will teach you how to make simple computer virus.

Make New folder using command prompt

First of all you have to make New Folder using command prompt i.e MS DOS or you can say by bat file. It needs simple syntax.

How To Make New Folder Using Command Prompt

Steps of making New Folder by MS DOS are:
1:Open Note Pad i.e By right click on desktop, go to New Click on Text document
2: Syntax of making folder or directory is "Mkdir (location) (Name)
E.g: If you want to make folder in drive D the command will be
"Mkdiv D:\Newfolder"
(Note: Inverted commas are not the part of command)
3:Save that file in Bat format. i.e .Bat
4:Run that bat file and see the location you given to command new folder would be there.


Use that Bat file as Virus

Now you are going to make virus through this command. Follow the above procedure to make new folder but now you have to make a large number of folders i.e
Mkdiv D:\1
Mkdiv D:\2
Mkdiv D:\3
Mkdiv D:\4
Mkdiv D:\5
Mkdiv D:\6
Mkdiv D:\7
Mkdiv D:\8
Mkdiv D:\9
Mkdiv D:\10
and so on as large as you want to make in the victims computer. Now save that file as Bat and send that file to victims computer and ask him to run. When he will run that file large number of folders will be created. i.e undesirable change in his computer would be made and he you will have made the the virus.
This is very simple technique and you can use that among your friends, and can have fun.

Wednesday 5 November 2014

Intorduction to Search Engine Optimization

What is SEO?

SEO stands for Search Engine Optimization. It is a process by which one makes it's website,webpage, or blog prominent in the search engines likes Google, Yahoo, Bing. SEO is also defined as "Search engine optimization (SEO) is the process of affecting the visibility of a website or a web page in a search engine's "natural" or un-paid ("organic") search results."


Purpose:

The purpose of SEO is to appear your site/blog in the search results. When the site becomes prominent it causes more people to visit your site, which increases your traffic and hence your Alexa rank, and Page Rank also Increases which ultimately makes your site famous and you can earn more from it.

History:

SEO starts in 1990's First of all webmasters and providers of content uses the Directory submission method than they realize the importance of Whine Hat, Black hat and Grey Hat practitioners. They started manipulating the Keywords and select those Keywords which appears most in searches.In 1998 Page and Brin founded Google. This search engine attracted the internet users a lot. The main thing in Google was that it was so simple and search results was based on Off-page factors (such as PageRank and hyperlink analysis) as well as on-page factors (such as keyword frequency, meta tags, headings, links and site structure). From 2004 to 2012 Google made magnificent progress in it's system and changes it's algorithm frequently and began to personalizes the search results for each user. Now top search engine is Google and after that Yahoo and Bing.

Methods:

Directory submission
Article Writing
Comment Approving
Preventing crawling

Meta Keywords
Meta Description etc.

Tuesday 4 November 2014

Top 10 Search Engines Information

Here is the Information of top 10 Search Engines. This Article will give you information about their:-
  • Alexa Rank
  • Page Rank
  • External Backlinks
  • Referring Domains
  • Backinks EDU
  • Backlinks Gov
  • Monthly Unique Visits

1: Google
         
         Google sign                                 
Google.com is the world's number one search Engine. It's Information is given below:

  • Global Alexa Rank:1

  • United States Alexa Rank: 1

  • Page Rank: 9/10

  • External Backlinks: 15912820656 

  • Referring Backlinks: 14568420

  • Backlinks EDU: 93078906

  • Backlinks Gov: 35703424

  • Monthly Unique Visits: 1,100,000,000


2:Yahoo Search Engine                
                       

Yahoo.com is 2nd largest Search Engine of the world, It's Information is given below:
  • Global Alexa Rank: 4 

  • United States Alexa Rank: 5 

  • Page Rank: 9/10 

  • External Backlinks: 1535633072 

  • Referring Backlinks: 2276674 

  • Backlinks EDU: 4807126 

  • Backlinks Gov: 2757611 

  • Monthly Unique Visits:  300,000,000


3: Bing   
       
                Bing sign
Bing is the 3rd largest Search Engine of World Wide Web. It's Information is given below:

  • Global Alexa Rank: 23

  • United States Alexa Rank: 21 

  • Page Rank: 8/10 

  • External Backlinks: 13502027

  • Referring Backlinks: 373879 

  • Backlinks EDU: 301116 

  • Backlinks Gov: 319606 

  • Monthly Unique Visits: 350,000,000


4: Ask
                         ask sign

Ask.com ranks number four in search engines. It's Information is given below:
  • Global Alexa Rank: 34 

  • India Alexa Rank: 30 

  • Page Rank: 8/10 

  • External Backlinks: 37291967 

  • Referring Backlinks: 101225 

  • Backlinks EDU: 24911 

  • Backlinks Gov:7463 

  • Monthly Unique Visits: 245,000,000


5: Aol Search                aol sign

Aol.com is rising search engine and it ranked 5 in search engines. It's information is given below:
  • Global Alexa Rank: 123 

  • United States Alexa Rank: 43 

  • Page Rank: 8/10 

  • External Backlinks: 69786721  

  • Referring Backlinks: 373912 

  • Backlinks EDU: 125976 

  • Backlinks Gov:59633 

  • Monthly Unique Visits: 125,000,000


6:Wow Search

                 wow logo

wow.com is another Search Engine from United States of America. It's Information is given below:
  • Global Alexa Rank: 55

  • United States Alexa Rank: 397 

  • Page Rank: 0/10 

  • External Backlinks: 619660 

  • Referring Backlinks: 4690 

  • Backlinks EDU: 122      

  • Backlinks Gov:24 

  • Monthly Unique Visits: 100,000,000

7: MyWebSearch
            mywebsearch sign

  • Global Alexa Rank: 975  

  • United States Alexa Rank: 3,908 

  • Page Rank: 5/10 

  • External Backlinks: 498541 

  • Referring Backlinks: 8479 

  • Backlinks EDU: 966 

  • Backlinks Gov:176 

  • Monthly Unique Visits: 60,000,000


8: WebCrawler Search

             webcrawl sign

  • Global Alexa Rank: 1,628  

  • United States Alexa Rank: 3,086 

  • Page Rank: 0/10 

  • External Backlinks: 1157782 

  • Referring Backlinks: 29834 

  • Backlinks EDU: 6013 

  • Backlinks Gov:348 

  • Monthly Unique Visits: 65,000,000


9:InfoSpace Search

info space sign

  • Global Alexa Rank: 1,936 

  • Brazil Alexa Rank: 545 

  • Page Rank: 0/10 

  • External Backlinks: 5145480 

  • Referring Backlinks: 17564 

  • Backlinks EDU: 1937 

  • Backlinks Gov:186 

  • Monthly Unique Visits: 24,000,000


10: Info Search

           Info.com Symbol

  • Global Alexa Rank: 1,936 

  • Brazil Alexa Rank: 545 

  • Page Rank: 0/10 

  • External Backlinks: 5145480 

  • Referring Backlinks: 17564 

  • Backlinks EDU: 1937 

  • Backlinks Gov:186 

  • Monthly Unique Visits: 24,000,000


Popular Posts


© 2013 Grasp Info. All rights resevered. Designed by Graspinfo

Back To Top